SAML 2.0 Setup for Okta
Hivelocity (myVelocity and the E-Commerce Store) can authenticate users with an IDP (Identity Provider) that supports the SAML 2.0 protocol. This document will guide you through configuring your Okta account as an Identity Provider to authenticate with the Hivelocity API.
Hivelocity (myVelocity and the E-Commerce Store) can authenticate users with an IDP (Identity Provider) that supports the SAML 2.0 protocol.
This document will guide you through configuring your Okta account as an Identity Provider to authenticate with the Hivelocity API.
Configuring Okta
It takes just a few minutes to configure Hivelocity to use Okta as an Identity Provider using SAML 2.0.
- Start in your Okta control panel, and navigating to the
Applicationssection. - Click the button to
Create App Integration. - Choose
SAML 2.0as the Sign-in method and clickNext. - Name your Integration as you see fit. For these instructions we will use the name
myVelocity.
On the next screen Okta has fields for a few URLs:
- Single sign-on URL
- Audience URI (SP Entity ID)
- Destination URL (Optional)
- Audience URI (Optional)
You will use the same value in all of these fields. https://core.hivelocity.net/api/v2/saml/<client_id>/callback
Make sure you replace
<client_id>in the URL with the unique client id for your myVelocity Account.
After you fill in these URLs
- Set the
Name IDformat toEmailAddress - Set the
Applicationusername toEmail
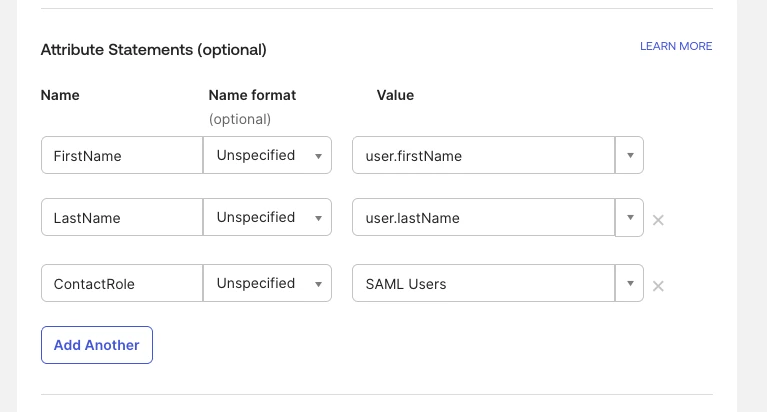
If you wish to fully support SCIM User Provisioning, you should configure the Attribute Statements section as shown below.
Optionally, you can map a user field called ContactRole. If you have a matching role in myVelocity, this will be automatically assigned to the Contact on their first successful login. The value for ContactRole can be anything you like, but it needs to match an existing Role in myVelocity.
Scroll to the bottom and click Next.
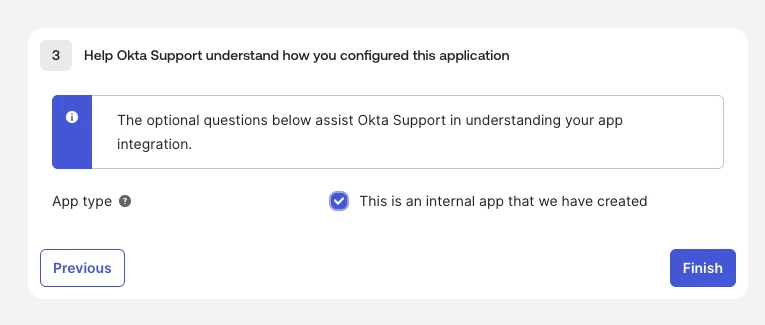
You may be presented with an additional screen for Okta feedback to understand the integration you created. We recommend you check the box for “This is an internal app that we have created” and click Finish as shown below.
Configuring myVelocity
Next you will provide Okta's information to myVelocity. Login to myVelocity as your Primary Client account and navigate to the Settings section by clicking your Avatar in the top-right of your screen. Choose Single Sign-On (SSO) from the navigation pane on the left of your screen. Toggle the SAML Identity Providersection, three fields will appear.
- Metadata URL
To get the Metadata URL, Click the Sign On tab of the Integration you just created in Okta. Paste the Metadata URL from Okta into the Metadata URL field in myVelocity.
- Entity ID
To get the Entity ID, click the View SAML setup instructions button in Okta's Sign On tab. Paste the Identity Provider Single Sign-On URL from Okta into the Entity ID field in myVelocity.
- IDP Metadata (XML)
Lastly, look for the IDP metadata field. on the setup instructions page in Okta. The IDP metadata is a blob of XML that contains information necessary for authentication to work. Paste the full contents of the IDP metadata field from Okta into the IDP Metadata (XML) field in myVelocity.
Click Save Settings. Now you can login to myVelocity (and the Hivelocity Store) using your Okta credentials.
Note: Once SAML is enabled in myVelocity, you will no longer be able to authenticate directly with your Username and Password. If for some reason you have an issue with your SAML configuration which is preventing you from logging in, you can use the DELETE endpoint under the SAML section in the Hivelocity API or contact Customer Support to have SAML disabled on your account.
Account Provisioning and Permissions
To allow users to login to myVelocity, you will need to make sure that the user in Okta is granted permission to the Integration you created and that there is a corresponding Sub-Account in myVelocity with a matching email address.
You can automatically assign a singular Role (and associated permissions) to all Sub-Accounts by configuring the ContactRole in the Attribute statements section as detailed above, but if you need more granular per-user permissions you will need to manage them directly in myVelocity.
SCIM Identity Management (Optional)
SCIM is an open standard protocol that automates the management of user identities between identity providers and cloud-based applications.
Note: For ease of troubleshooting, it is recommended you have SAML login fully working in myVelocity before attempting to enable SCIM in your Integration
Enable SCIM under the Provisioning section of App Settings for the Integration you created above. Under the Provisioning tab of the Integration you will need to supply a few pieces of information.
- SCIM connector base URL
The base URL will be [https://core.hivelocity.net/api/v2/scim](https://core.hivelocity.net/api/v2/scim)
- Unique identifier field for users
Enter the text userName
- Supported provisioning actions
Choose the Import New Users and Profile Updates option
- Authentication Mode
Select HTTP Header and insert your API Key from myVelocity into the Token field.
Your API Key(s) can be managed by navigating to the Settings section in myVelocity and selecting API Keys from the navigation area on the left of the screen.
Updated 6 months ago